Setup a website with Publish and GitHub Pages
In this tutorial I will show you how to create a website using Publish and GitHub Pages. I'm focusing on the "organization" style page, since I am creating my own personal website. If you want to follow along in code, I am using a git branch for this that you can find here.
GitHub Pages
GitHub Pages is a service that GitHub provides for publishing a website for you, a company, or a project. For free you get one site per GitHub account and organization, and unlimited project sites. It's a perfect way to host basic websites as a developer and it's why I'm moving my websites from Webflow to GitHub Pages to save on costs.
Setting up your GitHub Pages website
The setup for GitHub Pages is really simple: just follow the step-by-step instructions on the front page.
- Create a repository with the name
*ORG_NAME*.github.io. Note that the ORG_NAME needs to match the username/organization name exactly, otherwise it won't work. - Clone the repository created
$ git clone https://github.com/*ORG_NAME*/*ORG_NAME*.github.io - Navigate to the folder
$ cd *ORG_NAME*.github.io - Create an
index.htmlfile with$ echo "Hello World" > index.html - Push the new file to the git repo
$ git add .->$ git commit -m "Initial commit"->git push
That's it for the setup. The new site will be running at https://*ORG_NAME*.github.io when the automatically provided GitHub action finishes running.
Publish
Publish is a static site generator build for Swift developers by John Sundell. It enables websites to be build using Swift, supports themes, plugins, etc. The Publish framework is used to create John Sundells site swiftbysundell.
Setup
Publish comes with a command line setup tool and you can install it using Homebrew by running $ brew install publish. Note: the homebrew support is not officially maintained.
For us to be able to setup our website using publish, we need to empty the directory for our website before being able to run $ publish new to create all the files we need. I simply moved the index.html to the desktop, ran $ publish new, and copied it back and deleted it in another commit. This way it's easier to follow all the smaller steps using the git branch.
Development
Developing a Publish website is fairly simple if you are familiar with Swift Packages and have Publish installed locally (like you do if you have followed this tutorial).
Running the site on your local machine is as easy as using the command line and running $ publish run. This will build the site and create a locally running server at http://localhost:8000. Navigate there to see the locally running template site.
By default your site is using the Foundation theme and by replacing that you can customize how your site acts. In this tutorial we'll be focusing on the setup and publishing of the website in GitHub Pages, so won't go through how you can create your own theme. That's a subject of it's own tutorial.
As I have done here, the basic Foundation theme and folder structure allows you to create new markdown files under Content -> posts and those will be automatically made in to their own pages. As with Swift by Sundell, this is the basic workflow the framework was created for and it is the way I plan to use my site.
In the next blog post I'll go more in depth on how you can add sections and create your own theme. So stay tuned for that!
Deploying the site
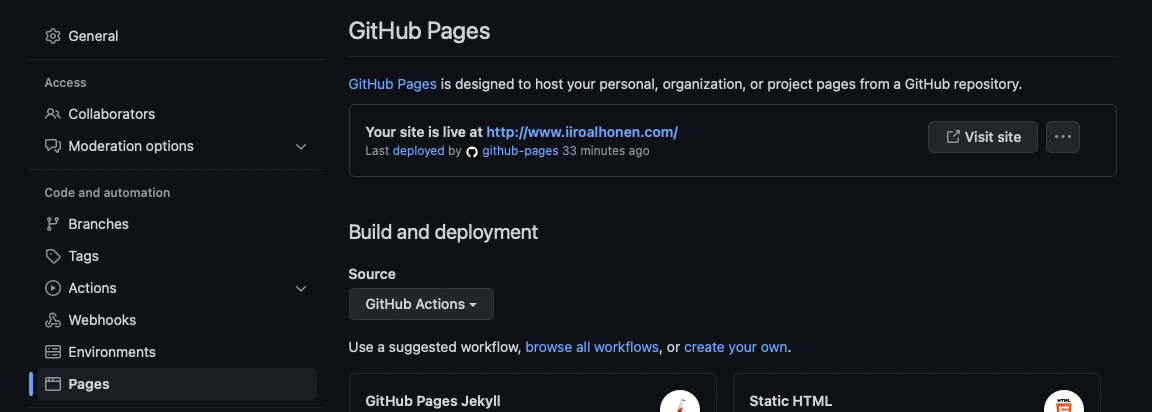
If you were to push this to your git repo now, it will not run. That is because your output files (being your actual HTML files) are located in the Output folder while GitHub looks for the index.html file in the root of the project. This will give you lovely 404 File not found error for your site. The interesting thing is that from the settings for your repo, under Settings -> Code and automation -> Pages there is an option for setting the branch to be build and a folder to build, but it will only give you two options: /(root) and /docs.
This is obviously a problem, but it is easily solvable by writing a custom GitHub action.
Custom GitHub Action for deployment
To use a custom GitHub Action for development go to Settings -> Code and automation -> Pages and under Build and deployment select GitHub Actions for the Source.
Then we customize the template to look like this:
name: Deploy

on:
  push:
    branches: [ "main" ]

  # Allows you to run this workflow manually from the Actions tab
  workflow_dispatch:

# Sets permissions of the GITHUB_TOKEN to allow deployment to GitHub Pages
permissions: write-all

# A workflow run is made up of one or more jobs that can run sequentially or in parallel
jobs:
  build:
    runs-on: ubuntu-latest
    steps:
      - uses: actions/checkout@v3

      # Copies and installs Publish by John Sundell
      - name: Checkout Publish
        run: brew install publish

      - name: Build Publish site
        run: publish generate

      - name: Push Output folder to a git subtree for automatic deployment
	    run: git push origin `git subtree split --prefix Output main`:production --force
Save the workflow and give it a descriptive name, like deploy.yml. Now it will run on all pushes to main.
The neat part about this workflow is that we are using git subtree command to push the Output folder to essentially its own branch that we can deploy using the automated system. Go back to Settings -> Code and automation -> Pages and under Build and deployment select Deploy from a branch for the Source. For the branch you need to select production which doesn't exist yet. You can either let merge the changes to you main branch or run git subtree push --prefix Output origin production command manually. After that the branch is created and you can set it as the build branch.
The parts that is not ideal about this workflow: 1. Using Homebrew to install Publish for it's build tooling. It takes a long time and doing it on every push to main is bit of an overkill. You could avoid this by running the publish generate command on your machine to limit the amount of work for the GitHub Actions machines, but that requires you to remember that every time, which is not ideal.
But we can do better. We can create another GitHub action to build the Output folder on our PRs and push it to that branch before we merge it. This means that the workflow that runs on our main branch is not affected by the long Homebrew builds and we can quickly do hot fixes when needed.
So let's delete those Checkout Publish and Build Publish site steps and add them to a separate workflow that will look like this:
name: Build Output

on:
  pull_request:
    types: [labeled, ready_for_review]

defaults:
  run:
    # GitHub's default is `bash --noprofile --norc -eo pipefail {0}`. Add the `-u` flag to fail on undefined variables.
    # See: https://github.com/actions/runner/blob/main/docs/adrs/0277-run-action-shell-options.md
    shell: bash --noprofile --norc -euo pipefail {0}

jobs:
  build-output:
    name: Build output
    runs-on: ubuntu-latest
    if: ${{ github.event.action != 'labeled' || github.event.label.name == 'build output' }}
    steps:
      - name: Remove 'build output' label
        if: ${{ github.event.action == 'labeled' }}
        # https://docs.github.com/en/rest/reference/issues#remove-a-label-from-an-issue
        run: |
          curl \
            -X DELETE \
            -H 'Accept: application/vnd.github.v3+json' \
            -H 'Authorization: token ${{ github.token }}' \
            'https://api.github.com/repos/${{ github.repository }}/issues/${{ github.event.number }}/labels/build%20output'

      - name: Checkout
        uses: actions/checkout@v2

      # Copies and installs Publish by John Sundell
      - name: Checkout Publish
        run: brew install publish

      - name: Build Publish site
        run: publish generate

      - name: Push changes to the Output folder
        run: |
          git config --global user.name "Buildbot"
          git config --global user.email "buildbot@users.noreply.github.com"
          git add Output/*
          git commit -m "[BOT] build output for ${{ github.event.number }}"
          git push origin HEAD:${{ github.head_ref }} --force
The triggering action is when you add a build output label on a PR, or when the PR is no longer a draft. It will generate the code for the Output folder and push it to the branch. Now you no longer have to manually remember to generate the files and we are not crowding our main branch workflow with long build steps.
That's it. Now you have a website that is build with Publish running on GitHub Pages.